Setting Up TrustTunnel on iOS
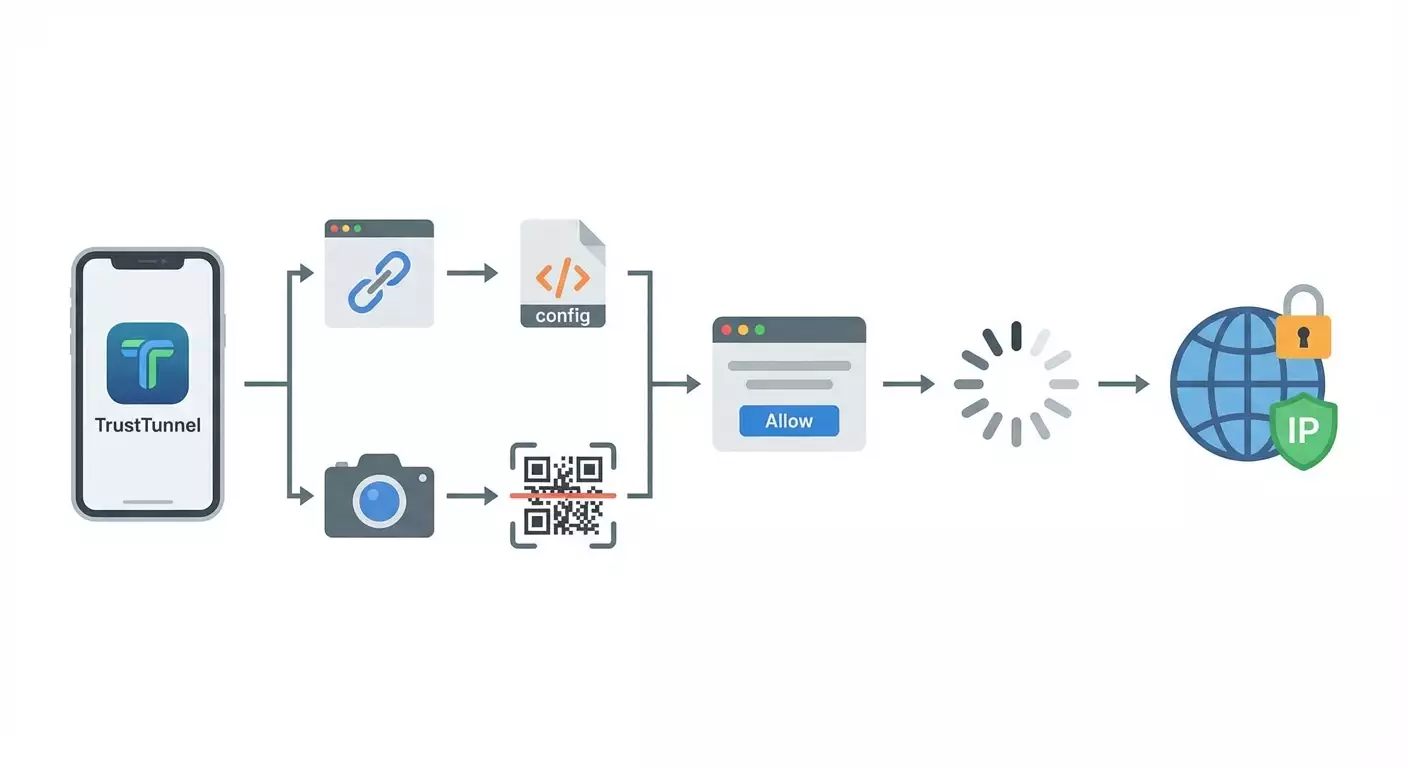
A step-by-step guide to installing and configuring TrustTunnel on iOS. In just 20–40 minutes, you'll learn how to install the client via TestFlight or directly, import your configuration from vpn.how (tt://, QR code, or manually), connect, and verify your IP. The result — a stable, secure VPN.
Content of the article
- Introduction
- Getting ready
- Key concepts
- Step 1: install trusttunnel flutter client
- Step 2: import configuration via tt:// uri
- Step 3: import configuration via qr code
- Step 4: manual profile setup
- Step 5: connect and authorize vpn profile
- Step 6: verify your ip address
- Verify your setup
- Common errors and fixes
- Extra features
- Faq
- Conclusion
Introduction
This is your detailed guide to setting up TrustTunnel on iOS. We'll walk you through each step to get your VPN up and running on your iPhone or iPad. By the end, you'll have installed the TrustTunnel Flutter Client, imported your configuration directly from your vpn.how dashboard, connected to the server, and confirmed your IP change. We'll cover every import method: using the special tt:// URI, scanning a QR code, or manual entry (server, port, SNI, Client ID, Client Secret). Each step includes clear instructions, examples, tips, and checks to avoid errors.
Who is this guide for? Anyone who wants a quick, reliable way to set up TrustTunnel on iOS. Whether you're new to VPNs or experienced, this guide keeps it simple and jargon-free. All you need is basic iPhone or iPad familiarity and your password or Face ID for system prompts.
What you need to know beforehand: you should already have a vpn.how account since your connection details are stored there. If you don’t have one yet, sign up and get access first. No special network knowledge is required — we'll explain everything as we go.
Time needed: about 20 to 40 minutes, including installing the client, importing your profile, making your first connection, and checking your IP. If you're new to TestFlight, add 5–10 minutes to install the TestFlight app from the App Store and accept the invitation.
Tip: Free up 100–200 MB of space on your device and update iOS to the latest version before starting. This makes installation smoother and reduces the risk of issues.
⚠️ Note: If TrustTunnel isn’t available in your App Store region, you can still use it—install the TrustTunnel Flutter Client via TestFlight (if you have an invite) or download it directly from the repository. As a last resort, you can use TrustTunnel via the CLI client on macOS. This guide focuses on iOS but highlights options to bypass restrictions.
Getting Ready
Before installing, let's make sure you have everything you need to save time and avoid common VPN setup mistakes on iOS.
Required Tools and Access
- An iPhone or iPad with the latest iOS/iPadOS version.
- Access to your vpn.how dashboard, where all connection info lives: server, port, SNI, Client ID, Client Secret, plus buttons and QR codes for importing configs via tt://.
- A stable internet connection via Wi‑Fi or mobile data.
- Access to TestFlight (if the build is available) or direct download of TrustTunnel Flutter Client from the developer’s repository.
System Requirements
- iOS/iPadOS version 15.0 or higher recommended to ensure VPN API compatibility.
- At least 100 MB of free space.
- Face ID, Touch ID, or device passcode enabled to confirm VPN profile installation when connecting for the first time.
What to Download and Install
- The TestFlight app (if installing TrustTunnel through TestFlight).
- TrustTunnel Flutter Client for iOS. You can find it here: https://github.com/AliMersin/TrustTunnelFlutterClient. Use the latest available build either via TestFlight or direct download, if provided.
Backup Recommendations
Strictly speaking, VPN setup doesn't require system backup, but your VPN credentials are sensitive data. Save your Client ID, Client Secret, and server address securely in a password manager to easily reinstall when switching devices.
Tip: Take a screenshot of your vpn.how dashboard’s QR code and store it in an encrypted note within your password manager. This speeds up restoring access if you reinstall the app.
Key Concepts
Before you start, it helps to know a few basics. These simple terms will boost your confidence.
- VPN — an encrypted "tunnel" between your device and the server. It hides your real IP and protects your traffic, especially on public Wi‑Fi.
- TrustTunnel — the client and protocol for secure connections. Here, we're setting up TrustTunnel Flutter Client on iOS.
- vpn.how Dashboard — the web interface where all your VPN settings are stored. It includes the "Import via tt://" button, QR code configuration, and data for manual input (server, port, SNI, Client ID, Client Secret).
- tt:// URI — a special link starting with tt:// that opens TrustTunnel and imports settings automatically, no manual input needed.
- QR Code Configuration — a quick alternative import method by scanning the QR code in the vpn.how dashboard to auto-fill all settings.
- SNI — Server Name Indication, a field in TLS. Simply put, it's the "host name" your client sends when initiating an encrypted connection. Use the SNI exactly as shown in your vpn.how dashboard.
- Client ID and Client Secret — your credentials for TrustTunnel, found in your vpn.how account. Keep these confidential and don’t share them.
What’s important: all critical parameters are prepped for you in vpn.how. Our job is to correctly transfer them into the app, approve the system VPN profile, and verify the IP change.
Tip: If you’re unsure which import method to pick, start with tt://—it’s the fastest and least error-prone.
Step 1: Install TrustTunnel Flutter Client
Goal
Get the TrustTunnel Flutter Client app on your iPhone or iPad, so you’re ready to import your configuration and connect to the VPN.
Detailed Steps
- Open the App Store and search for TestFlight. Tap "Get" and wait for it to install. If you already have TestFlight, move to the next step.
- Visit the TrustTunnel Flutter Client repository: https://github.com/AliMersin/TrustTunnelFlutterClient. Read the description. If there’s a TestFlight invite available, use it.
- If you have a TestFlight invitation, open the invite link on your iOS device. Accept the invite, then tap "Install" next to "TrustTunnel Flutter Client."
- If TestFlight isn’t an option, check the releases section in the repository for direct-install instructions provided by the developer. Make sure the source is trustworthy.
- Wait for installation to finish. The TrustTunnel icon will appear on your iOS home screen.
- Launch TrustTunnel once to confirm it opens error-free. If asked for permission to send notifications, choose "Don’t Allow" if you prefer — it won’t affect VPN performance.
Key notes: The app must be installed on the device where you’ll open tt:// links and scan QR codes. Keep internet connected at all times.
⚠️ Note: If TrustTunnel isn’t available in your region, try TestFlight via a developer invite. If no option works, the temporary fallback is using TrustTunnel CLI client on macOS to create a VPN tunnel on your laptop.
Tip: If downloads are slow, switch your connection from mobile data to Wi-Fi or vice versa.
Expected Outcome
TrustTunnel Flutter Client is installed and launches without errors. You see the main app screen with a "Connect" button and options to import or edit configurations.
Common Issues and Fixes
- No "Install" button in TestFlight? The invite may be expired or invalid. Solution: request a new invite, wait for a new build, or use direct install from the repository if available.
- App won’t open? Your iOS might be outdated. Solution: update to the latest iOS version and reinstall.
- Region block on installation? Solution: install via TestFlight invite or use CLI on macOS as a temporary alternative.
✅ Check: You see the TrustTunnel icon on the home screen and the app opens to its start screen with no errors.
Step 2: Import Configuration via tt:// URI
Goal
Quickly and error-free import all VPN settings from vpn.how using the special tt:// link.
Detailed Steps
- Log into your vpn.how dashboard through Safari on your iPhone or iPad. Sign in if needed.
- Locate the TrustTunnel settings section. Confirm you see server, port, SNI, Client ID, and Client Secret. Look for the "Import via tt://" button or similar.
- Tap the "Import via tt://" button. A system prompt should appear asking to open the link in TrustTunnel.
- Confirm to open TrustTunnel. The app will launch and import the configuration automatically.
- Check that the imported profile appears in the profile list or on the main screen. The profile name usually matches the server name or your subscription plan.
Key notes: All data comes directly from your vpn.how dashboard and should be accurate—no changes needed. Using tt:// minimizes typos and speeds up setup.
Tip: If the tt:// link opens in another app by mistake, copy it, paste it into Safari’s address bar, and allow it to open in TrustTunnel.
Expected Outcome
The profile imports successfully. TrustTunnel shows all fields filled: server address, port, SNI, plus Client ID and Client Secret. The profile is ready to connect.
Common Issues and Fixes
- tt:// link won’t open? Possibly TrustTunnel isn’t installed or iOS doesn’t recognize the scheme. Solution: ensure TrustTunnel is installed, restart it, try again from Safari.
- Imported profile fields are empty? The link might be corrupted or outdated. Solution: generate a fresh tt:// link in your vpn.how dashboard and re-import.
- Wrong app opens? Scheme conflict. Solution: copy the tt:// link, paste into Safari, then select "Open in TrustTunnel."
✅ Check: TrustTunnel shows the imported profile with correct server, port, and SNI. The "Connect" button is active.
Step 3: Import Configuration via QR Code
Goal
Import your configuration if tt:// is temporarily unavailable, or you prefer scanning the QR code from vpn.how.
Detailed Steps
- Open your vpn.how dashboard on another device (like a laptop) to display the QR code, or find the QR code on your iPhone and show it on another screen.
- Launch TrustTunnel on your iPhone or iPad. Go to the add/import profile section and choose "Scan QR" (or similarly named option).
- Point your device’s camera at the QR code. Make sure it’s entirely in frame and well-lit.
- Wait for automatic recognition and import. The app should display the profile with fields filled in.
Key notes: The QR code in vpn.how contains all required parameters. After scanning, double-check server, port, and SNI are correct.
Tip: If the camera doesn't focus, slightly move your phone away from the screen or zoom the QR code on the other device.
Expected Outcome
The profile imports from the QR code and is ready to connect. All fields fill automatically.
Common Issues and Fixes
- QR code not recognized? Probably due to glare or low image quality. Solution: lower screen brightness, adjust camera distance, or display QR on a different device.
- Profile fields empty after import? The QR code might be outdated. Solution: generate a new QR code in vpn.how and scan again.
- No "Scan QR" option? You might have an old app version. Solution: update TrustTunnel to the latest version and retry.
✅ Check: A new profile with correct parameters appears in TrustTunnel’s profile list. The "Connect" button next to it is available.
Step 4: Manual Profile Setup
Goal
Create a profile manually if tt:// or QR import isn’t available, using values from your vpn.how dashboard: server, port, SNI, Client ID, Client Secret.
Detailed Steps
- From your vpn.how dashboard, find TrustTunnel connection parameters: server address (e.g., nodeX.vpn.how), port (e.g., 443), SNI (e.g., sni.example.com), plus Client ID and Client Secret.
- Open TrustTunnel on your iPhone/iPad. Go to profiles and tap "Add Profile" or "Create New."
- In the "Server" field, enter the server address exactly as shown—no spaces or typos.
- In the "Port" field, enter the port as a number (e.g., 443).
- In the "SNI" field, enter the exact SNI value from vpn.how, without any spaces or prefixes like http/https.
- Paste your Client ID into the respective field from vpn.how.
- Carefully paste your Client Secret, ensuring no extra characters or spaces sneak in during copying.
- Save the profile by tapping "Save".
Key notes: Enter all fields exactly as in vpn.how. Case sensitivity and domain precision matter. Don’t change defaults unless instructed.
Tip: Copy Client ID and Secret separately, checking no spaces appear at start or end. If unsure, remove first and last characters, re-enter, and then paste the correct values.
Expected Outcome
Your manual profile is created with properly filled "Server," "Port," "SNI," "Client ID," and "Client Secret" fields. It's ready to connect.
Common Issues and Fixes
- Profile save error? Possibly a missing field or wrong port format. Solution: verify port is numeric and all fields filled.
- Connection fails? Could be a typo in SNI or server. Solution: carefully compare each field with vpn.how data and fix errors.
- Client Secret rejected? May have extra spaces. Solution: remove leading/trailing spaces and paste again.
✅ Check: Your manual profile appears in the list; tapping it displays accurately filled fields.
Step 5: Connect and Authorize VPN Profile
Goal
Establish a secure VPN connection with TrustTunnel. iOS will prompt you for permission to add the VPN profile for the first time.
Detailed Steps
- Open TrustTunnel and select your imported or manually created profile.
- Ensure your device’s internet is active. For best results, turn off Airplane Mode.
- Tap the "Connect" button on TrustTunnel’s main screen.
- iOS will display a system prompt saying "TrustTunnel wants to add VPN configurations." Tap "Allow."
- Confirm using Face ID, Touch ID, or your device passcode.
- Wait for the status to change to "Connected" or see the VPN icon appear in the iOS status bar near the network indicators.
Key notes: Approving the VPN profile is a required security step in iOS. Without it, your tunnel won’t activate. Always confirm the prompt coming from TrustTunnel itself.
⚠️ Warning: Never install VPN profiles from unknown sources. Only use TrustTunnel with parameters from your vpn.how dashboard to ensure safety and reliability.
Tip: If nothing happens after tapping "Connect," close and reopen the app. This often prompts iOS to show the system dialog properly.
Expected Outcome
TrustTunnel’s status shows "Connected," and the VPN icon appears in your iOS status bar. Your device traffic now goes through an encrypted tunnel.
Common Issues and Fixes
- No system approval prompt? Possible configuration conflict or freeze. Solution: reboot your device and try "Connect" again.
- Authentication error? Likely wrong Client ID or Secret. Solution: double-check and re-import or re-enter credentials from vpn.how.
- Connection hangs on "connecting"? Could be unstable network. Solution: switch networks (Wi-Fi to LTE/5G), try another vpn.how server/profile.
✅ Check: You see "Connected" in TrustTunnel and the VPN icon in your iOS status bar.
Step 6: Verify Your IP Address
Goal
Confirm your device is using the VPN tunnel and that your external IP address has changed.
Detailed Steps
- Make sure TrustTunnel shows the status "Connected."
- Open your browser on iPhone or iPad (Safari works great).
- Visit any IP-checking website by searching "what is my IP" or "check IP" and selecting a tool.
- Compare the IP before and after connecting. If you didn’t memorize your original IP, disconnect the VPN, note your IP, reconnect, and reload the page—it should be different.
Key notes: When VPN is active, the IP check site should show a new IP and usually a different location. This is the main sign your VPN is working.
Tip: Close private tabs and clear your browser cache if IP changes aren’t showing correctly right away. Sometimes cached data can interfere.
Expected Outcome
Your external IP is different after connecting via TrustTunnel, matching the country/city of the vpn.how server you selected.
Common Issues and Fixes
- IP doesn’t change? VPN might not be active or DNS issues. Solution: verify "Connected" status, restart the browser, toggle Wi-Fi off/on, and reconnect VPN.
- Access to IP checker blocked? Network restrictions may apply. Solution: try a different IP-check site or switch networks.
- IP changes but sites won’t load? Possibly DNS conflicts. Solution: reconnect VPN, reboot device, or reinstall the profile if needed.
✅ Check: The IP checker shows a new IP and you have an active VPN icon on your device.
Verify Your Setup
Checklist: What Should Work
- TrustTunnel is installed and launches without errors.
- Your profile is imported via tt://, QR code, or manually with vpn.how data.
- Tapping "Connect" establishes a VPN connection; iOS asks and you approve profile installation.
- The VPN icon is visible in the iOS status bar.
- Your IP matches the VPN and changes on the IP check site after connecting.
Testing Tips
- Try accessing content previously blocked — it should unlock.
- Visit multiple websites and apps to check connection stability.
- Run a brief speed test comparing VPN on vs off. Some slowdown is normal; major drops mean try another server.
Signs of Success
- Your connection stays stable for 10–15 minutes without drops.
- Your IP consistently matches the selected VPN server.
- No frequent authentication failures or reconnections.
Tip: If you notice slowdowns, pick a different server or port in vpn.how and re-import via tt://.
Common Errors and Fixes
- tt:// link doesn’t work → Cause: TrustTunnel not installed or scheme not recognized → Fix: Install TrustTunnel, open link in Safari, approve "Open in TrustTunnel," update app if needed.
- QR code won’t scan → Cause: glare, small code → Fix: enlarge QR on screen, adjust camera distance, lower screen brightness and try again.
- Connection error after manual entry → Cause: typo in SNI/server/port → Fix: compare fields to vpn.how data, correct, and save profile again.
- iOS doesn’t show VPN profile approval prompt → Cause: system glitch → Fix: restart device, tap "Connect" again, verify no MDM profiles blocking VPN.
- Connection drops after 1–2 minutes → Cause: unstable network or overloaded server → Fix: switch Wi-Fi to mobile data, pick a different vpn.how server, re-import profile.
- App crashes during import → Cause: outdated TrustTunnel version → Fix: update app via TestFlight or fresh build from repository.
- No internet after connecting → Cause: DNS conflict → Fix: disconnect and reconnect VPN, restart device, or re-import config from vpn.how.
Tip: For repeated errors, delete the profile and re-import via tt:// — this is the most reliable way to fix typos and mismatches.
Extra Features
Advanced Settings and Optimization
- Switch server/location: use a closer node from vpn.how to reduce latency. Import the new profile via tt://.
- Change port: some networks block common ports. vpn.how often provides alternates. Import a profile with a different port.
- Use SNI for masking: input the exact SNI from vpn.how. Some networks allow traffic easier with popular SNI values as specified in your dashboard.
- Multiple profiles: set up profiles for "Home," "Office," and "Travel" to switch servers effortlessly.
Tip: Name profiles clearly so you can quickly find the right server in the list.
⚠️ Reminder: Always enable your VPN before opening websites or apps on public Wi-Fi to prevent eavesdropping and protect your data.
Tip: If you travel often, pre-import 2–3 profiles from vpn.how to switch quickly around hotel or public Wi-Fi blocks.
Additional Suggestions
- Integrate with your password manager: securely save Client ID and Secret.
- Run speed tests periodically to monitor ping and bandwidth. Switch servers in vpn.how if performance drops.
- Check connection logs if you encounter problems to diagnose and support troubleshooting.
Tip: Re-import configuration via tt:// from vpn.how every month to keep your settings up to date and minimize issues.
FAQ
- What’s the easiest import method? — Using the tt:// URI from your vpn.how dashboard. Just click "Import via tt://" and confirm opening in TrustTunnel.
- Can I set up without TestFlight? — Yes, if direct TrustTunnel Flutter Client downloads are available in the repo. Check the release instructions. If nothing else works, use the CLI client on macOS as a temporary fix.
- Where do I get server parameters? — All in your vpn.how dashboard, including server, port, SNI, Client ID, and Client Secret. No need to search elsewhere.
- Do I have to enable notifications? — No, notifications don’t affect VPN operation. VPN profile approval is mandatory; notifications are optional.
- Why does my internet speed change? — Any VPN adds overhead. For better speeds, select a nearby server or alternative port in vpn.how and re-import.
- What if tt:// doesn’t open? — Make sure TrustTunnel is installed, open the link in Safari (not another browser), and authorize "Open in TrustTunnel." Reinstall the app if needed.
- Is it safe to store the QR code? — Yes, if kept in an encrypted password manager. The QR code contains VPN access info, so don’t share it publicly.
- Can I use the same profile on iPhone and iPad? — Yes, import the same config on both devices via tt:// or QR code from your vpn.how dashboard.
- How do I disconnect the VPN? — In TrustTunnel, tap "Disconnect." You can also disable VPN in iOS Settings → VPN.
- Do I need to configure anything manually in iOS? — No. TrustTunnel will add the VPN profile when you connect, and iOS just requests your confirmation.
Tip: If you often forget to turn off the VPN, set a reminder in your Calendar or use iOS Shortcuts automation to disable it automatically when you’re home.
Conclusion
You’ve completed the full TrustTunnel setup on iOS: installed TrustTunnel Flutter Client via TestFlight or direct download, imported your vpn.how configuration using tt:// or QR code, manually entered parameters if needed, authorized the VPN profile on iOS, connected, and verified your IP. Now your traffic is protected and your access to resources is stable.
Next steps: add alternate servers through your vpn.how dashboard and import new profiles as needed. If you encounter network blocks, experiment with different ports and SNI as provided by vpn.how. For any difficulties, refer back to the "Common Errors" section of this guide.
Looking ahead: explore advanced settings and iOS automations, and consider TrustTunnel’s CLI client on macOS if you work frequently from your laptop and want centralized VPN management. Remember: your vpn.how dashboard holds all essential keys and tools — it's your single source of truth and the fastest way to a working connection.
Tip: Check for TrustTunnel updates via TestFlight every few weeks and re-import your vpn.how configuration to stay current and reduce issues.
