Setting Up TrustTunnel for Windows
Complete step-by-step guide to setting up TrustTunnel on Windows: from downloading the client and getting the TOML config in your vpn.how dashboard to launching via URI, setting up system proxy, and full tunneling. Get a stable connection in just 20–40 minutes.
Content of the article
- Introduction
- Preparation
- Basic concepts
- Step 1: downloading trusttunnel cli client
- Step 2: obtaining the toml config from vpn.how
- Step 3: launching trusttunnel via toml config
- Step 4: launching trusttunnel via uri
- Step 5: setting system proxy in windows
- Step 6: full tunneling with proxifier or tun2socks
- Verifying the setup
- Typical issues and fixes
- Extra features
- Faq
- Conclusion
Introduction
You hold a practical guide that takes you step-by-step through setting up TrustTunnel on Windows using data from your vpn.how dashboard. By the end, you'll have a working connection through local SOCKS5 and HTTP proxies, be able to configure browsers and apps for secure internet access, and, if needed, enable full traffic tunneling via Proxifier or tun2socks. This easy-to-follow guide is designed for both beginners and experienced users who want to quickly and correctly run TrustTunnel on Windows 10 or Windows 11. We’ll cover where to download the client, how to get the TOML config from vpn.how, how to launch the client using TOML or URI, how to enable system proxy, and how to verify everything works.
Who this guide is for: Windows users needing VPN/proxy access via vpn.how services, as well as those wanting transparent tunneling for all apps. No prior knowledge needed—we explain basic terms and each step clearly.
What you should know beforehand: you must have access to your vpn.how dashboard where the TOML config and all your TrustTunnel data are available (under the TrustTunnel tab). Basic familiarity with handling files and command-line windows will help.
Estimated time: 20 to 40 minutes to set up and verify basics; an additional 10–20 minutes to integrate with Proxifier or tun2socks if you want full tunneling.
Preparation
Before diving in, make sure you have everything ready. Here’s a quick checklist.
Required Tools and Access
- Access to your vpn.how dashboard. There you’ll get the TOML config and URI. All necessary info is under the TrustTunnel tab.
- Windows 10 or Windows 11 with user rights to run programs from user directories.
- TrustTunnel CLI client (trusttunnel_client.exe) for Windows.
System Requirements
- At least 50 MB free disk space for the client and configs.
- Internet connection without strict blocks on outgoing TCP. If you face restrictions, use the bypass modes and alternative ports provided in your vpn.how dashboard.
- Antivirus and firewall should not block trusttunnel_client.exe. On first launch, allow connections when Windows Defender prompts.
What to Download and Install
- TrustTunnel CLI client from GitHub releases page: https://github.com/AliMersin/TrustTunnelClient/releases. Download the Windows binary file trusttunnel_client.exe.
- Optional: Proxifier for full tunneling (paid, with trial) or tun2socks (free tool). You’ll choose one later per instructions.
Backup and Environment Setup
- Create a folder for configs, e.g., C:\trusttunnel. We’ll store config.toml and the client here for convenience. This helps with support and updates.
- Take a screenshot or note of your current system proxy settings, if any, so you can quickly restore them later.
Tip: Use a folder name without spaces (like C:\trusttunnel) to simplify command prompt use and reduce typos.
Basic Concepts
Before starting, let’s clarify some terms in plain language to avoid confusion.
- TrustTunnel CLI Client is a command-line program (no GUI) that sets up local proxies on your PC and encrypts traffic to the service’s servers using parameters from the TOML config or URI.
- TOML Config is a text file with .toml extension containing settings. Download it from your vpn.how dashboard under the TrustTunnel tab. It holds everything needed for connection.
- URI tt:// is a special short connection string also available in your vpn.how dashboard. It lets you launch TrustTunnel without a separate config file.
- SOCKS5 and HTTP proxies are local proxies that the client launches on start. By default, SOCKS5 runs on 127.0.0.1:1080, HTTP on 127.0.0.1:8080. You’ll set them in browsers and apps.
- Full tunneling means all system traffic, including from apps without proxy support, goes through TrustTunnel. This uses Proxifier or tun2socks.
Tip: If unsure whether to start with TOML or URI, pick TOML. It’s easier to store, version, and reuse.
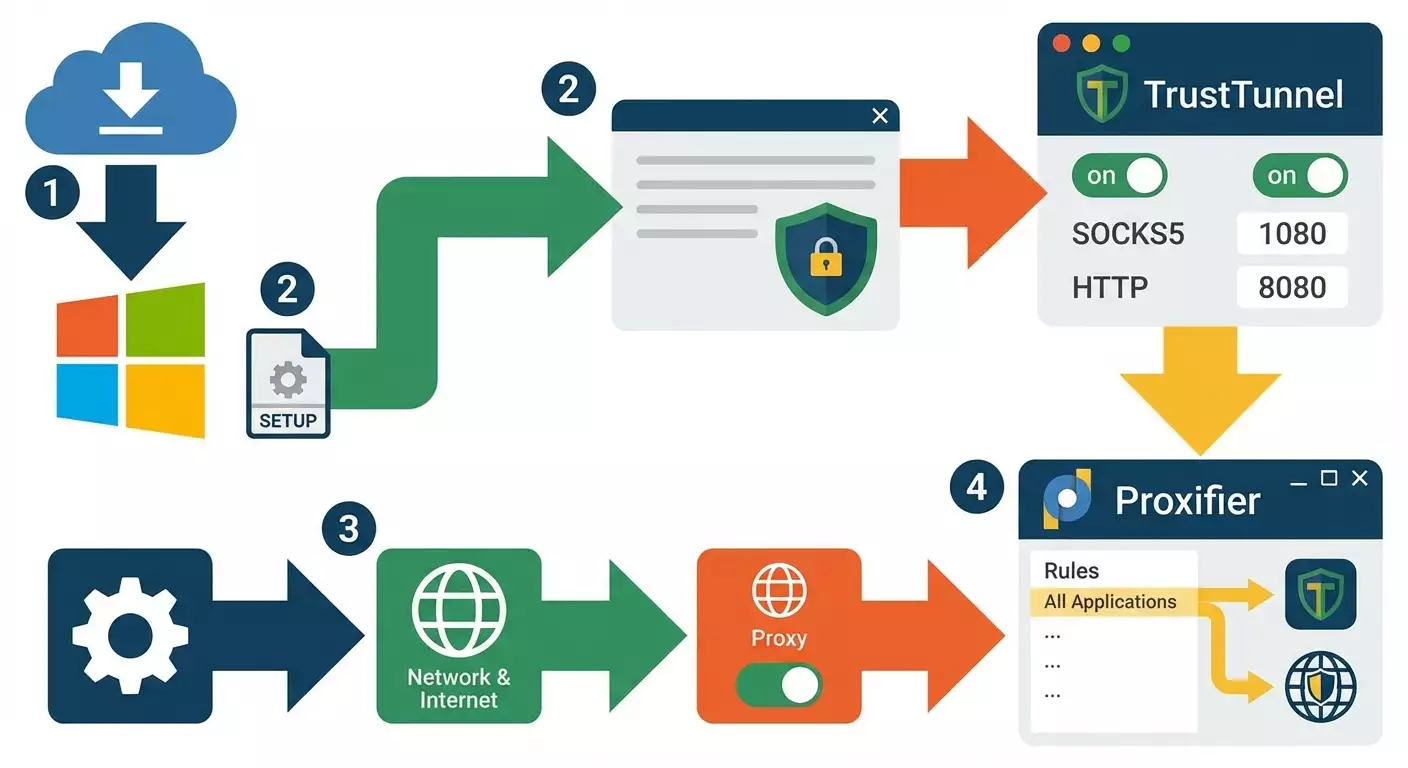
Step 1: Downloading TrustTunnel CLI Client
Goal
Download the latest trusttunnel_client.exe for Windows and place it in a convenient folder.
Instructions
- Open Microsoft Edge or any browser you prefer.
- Go to GitHub releases page: https://github.com/AliMersin/TrustTunnelClient/releases—the official place for client binaries.
- Find the latest version (usually at the top). The release name shows version number and Assets list.
- Under Assets, click the Windows file: trusttunnel_client.exe to start downloading.
- Create folder C:\trusttunnel if you haven’t: open File Explorer, go to C: drive, right-click empty space, choose New → Folder, name it trusttunnel.
- Move the downloaded trusttunnel_client.exe from Downloads to C:\trusttunnel by dragging.
- If your IT department requires, check the file's digital signature in Properties. Usually, just confirming it’s from the official releases page is enough.
⚠️ Warning: Don’t run files downloaded from unofficial sites. Use only the official release repo to avoid tampering or malware.
Tip: Save the version number in the filename (e.g., trusttunnel_client_1.2.3.exe) if you keep multiple test files. For daily use, keep the name trusttunnel_client.exe.
✅ Verification: In C:\trusttunnel, the file trusttunnel_client.exe should be present. Open Command Prompt: press Win+R, type cmd, press Enter. Type cd C:\trusttunnel and dir. You should see trusttunnel_client.exe listed.
Common Issues and Solutions
- Browser blocks download due to security policy: click Save anyway or Allow; add the file to antivirus exceptions if needed.
- No permission to write to C:\: use a user folder like C:\Users\YourName\trusttunnel, or run File Explorer as admin.
- File missing in release: you opened wrong release. Return to releases page and pick the latest stable version.
Step 2: Obtaining the TOML Config from vpn.how
Goal
Download the TOML config file from vpn.how dashboard and save it conveniently, e.g., C:\trusttunnel\config.toml.
Instructions
- Log into your vpn.how dashboard via browser.
- Open the TrustTunnel section. Your connection details appear here.
- Click TrustTunnel → Download TOML config. Your browser starts downloading a .toml file.
- Save the file as C:\trusttunnel\config.toml. If prompted, set folder C:\trusttunnel and filename config.toml.
- Open config.toml in Notepad to verify parameters are inside. Close without changes if unsure.
⚠️ Warning: Don’t manually edit sensitive keys or parameters in TOML unless necessary. Even a small typo can cause connection failure.
Tip: Keep a backup of the TOML in a safe place (e.g., encrypted archive) so you can quickly recover if deleted.
✅ Verification: Check that config.toml is in C:\trusttunnel. Open PowerShell and run Get-Content C:\trusttunnel\config.toml | Select-Object -First 5. You should see the first lines with parameters.
Common Issues and Solutions
- File won’t download: you are not logged in. Solution: log in again to vpn.how and retry.
- File saved in Downloads: move it to C:\trusttunnel and rename to config.toml.
- Corrupt TOML file: connection interrupted during download. Solution: download again from dashboard.
Step 3: Launching TrustTunnel via TOML Config
Goal
Start the client using config.toml and confirm local proxies are running.
Instructions
- Open Command Prompt: press Win+R, type cmd, press Enter.
- Go to client folder: type cd C:\trusttunnel and press Enter.
- Start client with config: enter trusttunnel_client.exe config.toml and press Enter.
- If Windows firewall prompts, allow access for Private networks so the client can establish connections.
- Watch the startup logs. Wait until messages confirm local proxies started. By default, SOCKS5 at 127.0.0.1:1080 and HTTP at 127.0.0.1:8080 will be up.
- Keep this window open; proxies are available while the program runs. To stop, press Ctrl+C here.
Tip: Create a BAT shortcut for quick launch. File C:\trusttunnel\start_tunnel.bat with content: cd /d C:\trusttunnel && trusttunnel_client.exe config.toml. Run by double-clicking.
✅ Verification: Open a new Command Prompt and run netstat -ano | findstr :1080 and netstat -ano | findstr :8080. You should see LISTENING on 127.0.0.1:1080 and 127.0.0.1:8080 indicating SOCKS5 and HTTP proxies are active.
Common Issues and Solutions
- Error on startup: file not found. Cause: not running from C:\trusttunnel directory. Fix: cd C:\trusttunnel then retry.
- Ports busy: another app uses 1080 or 8080. Fix: close that app or change ports in TOML config in vpn.how dashboard and download updated file.
- Firewall blocking: adjust rules in Windows Defender Firewall settings; add trusttunnel_client.exe and allow private networks.
Step 4: Launching TrustTunnel via URI
Goal
Alternative launch without a separate config file, using the URI from your vpn.how dashboard.
Instructions
- In vpn.how dashboard, go to TrustTunnel tab and find the URI string (starts with tt://). Copy it fully.
- Open Command Prompt and go to client folder: cd C:\trusttunnel.
- Run client with URI: type trusttunnel_client.exe --uri "tt://..." replacing the dots with your full URI from vpn.how.
- Allow firewall access if prompted.
- Wait for messages confirming local proxies on 127.0.0.1:1080 and 127.0.0.1:8080.
Tip: If the command doesn’t run properly due to spaces or special characters, make sure the entire URI string is enclosed in double quotes for correct parsing.
✅ Verification: Repeat netstat checks for ports 1080 and 8080 showing LISTENING. Do a quick test: in PowerShell run iwr https://api.ipify.org?format=json -Proxy http://127.0.0.1:8080. You should get your public IP via the tunnel.
Common Issues and Solutions
- URI not recognized: wrong quotes or truncated string. Fix: copy URI again and enclose in double quotes.
- Parameters outdated: key expired. Fix: generate fresh URI in vpn.how dashboard and restart client.
Step 5: Setting System Proxy in Windows
Goal
Connect browsers and apps to local proxies started by TrustTunnel: SOCKS5 127.0.0.1:1080 and HTTP 127.0.0.1:8080.
Instructions: System HTTP Proxy
- Open Windows Settings: press Win+I.
- Go to Network & Internet → Proxy.
- Disable Automatic proxy setup if enabled to avoid conflicts during testing.
- Enable Manual proxy setup.
- Enter proxy server address: 127.0.0.1.
- Enter port: 8080.
- Leave exceptions empty initially. Click Save.
Instructions: Browser Setup
Microsoft Edge/Google Chrome (use system proxy)
- After enabling system proxy, restart the browser.
- Visit an IP check website and confirm your IP changes when the client is running.
Mozilla Firefox (supports direct SOCKS5)
- Go to Settings → Network → Configure Connection Settings.
- Select Manual proxy configuration.
- Enter SOCKS Host: 127.0.0.1 and port 1080, select SOCKS v5.
- Uncheck Proxy DNS unless you want DNS requests proxied through SOCKS; otherwise, leave checked.
- Click OK and restart Firefox.
Tip: For apps with their own proxy settings, use SOCKS5 127.0.0.1:1080. If app only supports HTTP proxy, enter HTTP 127.0.0.1:8080.
✅ Verification: Open PowerShell and run two commands: 1) iwr https://api.ipify.org?format=json -Proxy http://127.0.0.1:8080; 2) curl.exe --socks5 127.0.0.1:1080 https://api.ipify.org?format=json. Both should return your IP via the tunnel.
Common Issues and Solutions
- Sites won’t load: client not running. Fix: start trusttunnel_client.exe as in Step 3 or 4.
- Some apps ignore proxy: they use direct sockets. Fix: use Proxifier or tun2socks for full tunneling (next step).
- DNS leaks: DNS resolving locally. Fix: in Firefox enable Proxy DNS via SOCKS or use system DNS over HTTPS; in Proxifier, configure DNS resolution via proxy.
Step 6: Full Tunneling with Proxifier or tun2socks
Goal
Route all app traffic, including those without proxy support, through TrustTunnel.
Option A: Proxifier (simple and intuitive)
- Download and install Proxifier (trial available). Open the app.
- Go to Profile → Proxy Servers → Add.
- Set Type: SOCKS Version 5, Address: 127.0.0.1, Port: 1080. Click Check to test connection, then OK.
- Go to Profile → Proxification Rules.
- Add a default rule: Action → Proxy SOCKS5 (127.0.0.1:1080). Move it to the bottom to apply to general traffic.
- Optionally, add exclusion rules for local addresses (e.g. 127.0.0.1/8, 192.168.0.0/16) → Action: Direct.
- Click OK and ensure Proxifier logs show connections going through the designated proxy.
Option B: tun2socks (for advanced users)
- Download tun2socks binary for Windows from the official project repo. Place it alongside C:\trusttunnel or in a separate folder.
- Create a virtual TUN adapter using tools specified in your tun2socks documentation (e.g., wintun or tap driver supported by your build).
- Run tun2socks specifying SOCKS5 source: 127.0.0.1:1080 and the virtual interface IP. See your tun2socks docs for exact command syntax.
- Set routes to direct system traffic through the virtual tun interface; ensure local networks remain accessible directly as needed.
Tip: Unsure which to pick? Start with Proxifier—it’s easier to configure and lets you control which processes use the proxy.
✅ Verification: Open an app that previously bypassed proxy (game launcher or messenger). Check Proxifier logs that traffic follows your proxy rule. Run tracert example.com—the route should differ from direct. Your browser IP through system proxy should match the tunnel IP.
Common Issues and Solutions
- App still bypasses proxy: rule not applied. Fix: move the rule higher in Proxifier and add forced proxying for specific exe processes.
- Speed drops: double proxying or encryption overhead. Fix: use only SOCKS5 protocol in Proxifier and disable extra traffic capture plugins.
- tun2socks won’t start: missing TUN/TAP driver. Fix: install required driver (e.g., Wintun), reboot, try again.
Verifying the Setup
Checklist
- trusttunnel_client.exe running and listening on 127.0.0.1:1080 (SOCKS5) and 127.0.0.1:8080 (HTTP).
- System HTTP proxy set to 127.0.0.1:8080 or apps using SOCKS5 127.0.0.1:1080.
- Your browser’s IP matches the tunnel address.
- When Proxifier is enabled, all designated processes route via the proxy.
How to Test
- Run PowerShell command: iwr https://api.ipify.org?format=json -Proxy http://127.0.0.1:8080. You should get JSON with your IP.
- Run: curl.exe --socks5 127.0.0.1:1080 https://api.ipify.org?format=json. The returned IP should match the tunnel.
- Visit multiple websites. Loading speed should be stable and error-free.
Tip: For clarity, check your IP before and after starting TrustTunnel: without proxy and then with the client active. This confirms your traffic is tunneled.
Typical Issues and Fixes
- Issue: trusttunnel_client.exe exits immediately. Cause: invalid or empty TOML config. Fix: re-download the TOML from vpn.how dashboard (TrustTunnel → Download TOML config) and restart.
- Issue: Browser won’t open sites via system proxy. Cause: client not running or port 8080 blocked. Fix: restart trusttunnel_client.exe, verify with netstat, allow firewall access.
- Issue: Some apps ignore proxy. Cause: direct sockets. Fix: configure Proxifier with forced proxy rules per process.
- Issue: Unstable speed. Cause: overloaded node or network rule conflicts. Fix: update TOML config from vpn.how (may have alternative nodes), restart client, temporarily disable other traffic capture software.
- Issue: DNS leaks. Cause: DNS resolving locally. Fix: enable Proxy DNS via SOCKS in Firefox or use system DoH; configure DNS resolution through proxy in Proxifier.
- Issue: Ports 1080/8080 busy. Cause: conflicting local proxies or services. Fix: close conflicting apps or request TOML with alternative ports in vpn.how dashboard.
- Issue: Antivirus blocks client. Cause: strict policies. Fix: add trusttunnel_client.exe to antivirus exceptions and confirm trust.
Extra Features
Advanced Settings
- Autostart: place the BAT shortcut in Windows startup folder (shell:startup) to auto-launch on login.
- Logs: redirect output to a file, e.g. start_tunnel.bat containing trusttunnel_client.exe config.toml ^>^> logs.txt 2^>^&1 for troubleshooting.
- Changing ports: if you need non-standard ports, get an updated TOML from vpn.how with new ports or node options.
Optimization
- Client protocol selection is usually automatic, but if vpn.how offers variants, test each to pick the best latency.
- In Proxifier, add local addresses and critical corporate sites to Direct exceptions so they bypass the tunnel.
Also Works on Linux and macOS
- Linux: download the corresponding TrustTunnelClient binary for Linux from releases. Make executable with chmod +x. Run via ./trusttunnel_client config.toml or ./trusttunnel_client --uri "tt://...". Proxies run on 127.0.0.1:1080 and 127.0.0.1:8080.
- macOS: download the macOS binary. Launch in Terminal: ./trusttunnel_client config.toml or with URI. Approve startup in Security & Privacy if prompted.
- Steps afterward are the same: set proxies in browsers or use system routing tools. For full tunneling on macOS, use Proxifier for macOS or similar apps.
Tip: If working cross-platform, keep one TOML and make copies per OS. This avoids confusion with settings.
FAQ
- Which launch method should I choose: TOML or URI? For steady daily use, TOML is recommended. For quick one-off connections, URI works well.
- Can I change ports 1080 and 8080? Yes, the safest way is to get a TOML with updated ports from vpn.how dashboard. This keeps client and docs aligned.
- Do I need to run as administrator? Generally no; user rights suffice. But some firewall or autostart scenarios might require elevated privileges.
- How to quickly check everything works? Use PowerShell iwr with -Proxy for HTTP and curl.exe with --socks5. Compare IPs with and without tunnel.
- Why is Proxifier better than tun2socks? Proxifier is more beginner-friendly with flexible per-app rules. tun2socks intercepts at the interface level, suitable for advanced setups.
- How to revert settings? Turn off system proxy in Settings → Proxy. Close client with Ctrl+C. Disable rules or close Proxifier. IP returns to normal.
- Why is speed slower than usual? Any tunnel adds overhead. Try alternate node from vpn.how, check connection quality, exclude traffic that doesn’t need encryption.
- Does this work with corporate proxies? Yes, but there might be restrictions. Check your security policy and configure cascade: corporate proxy → TrustTunnel if allowed, or use an IT-approved mode.
- Can I run multiple clients? Technically yes, with different ports and configs. Usually one instance is enough.
- What if URI expires? Go to vpn.how dashboard, generate a new URI in TrustTunnel section, then restart client.
Conclusion
Congratulations! You’ve set up TrustTunnel on Windows: downloaded the client, got the TOML config from vpn.how, launched the client via TOML or URI, configured system proxy, and enabled full tunneling with Proxifier or tun2socks if needed. Now your traffic routes through local proxies 127.0.0.1:1080 (SOCKS5) and 127.0.0.1:8080 (HTTP), ensuring a secure channel for your applications. If you hit any issues, revisit the Verification and Common Issues sections for quick fixes. Moving forward, consider adding client autostart, optimizing Proxifier rules, testing performance on different nodes from vpn.how, and picking the best one. For deeper control, study logs, configure DNS proxying, and add selective rules for fine security policies. As of 2026, these steps remain current to help you quickly achieve a reliable, manageable TrustTunnel connection on Windows.
