Apple TV 4K and VPN: Complete Setup via Profile, Smart DNS, and Router VPN
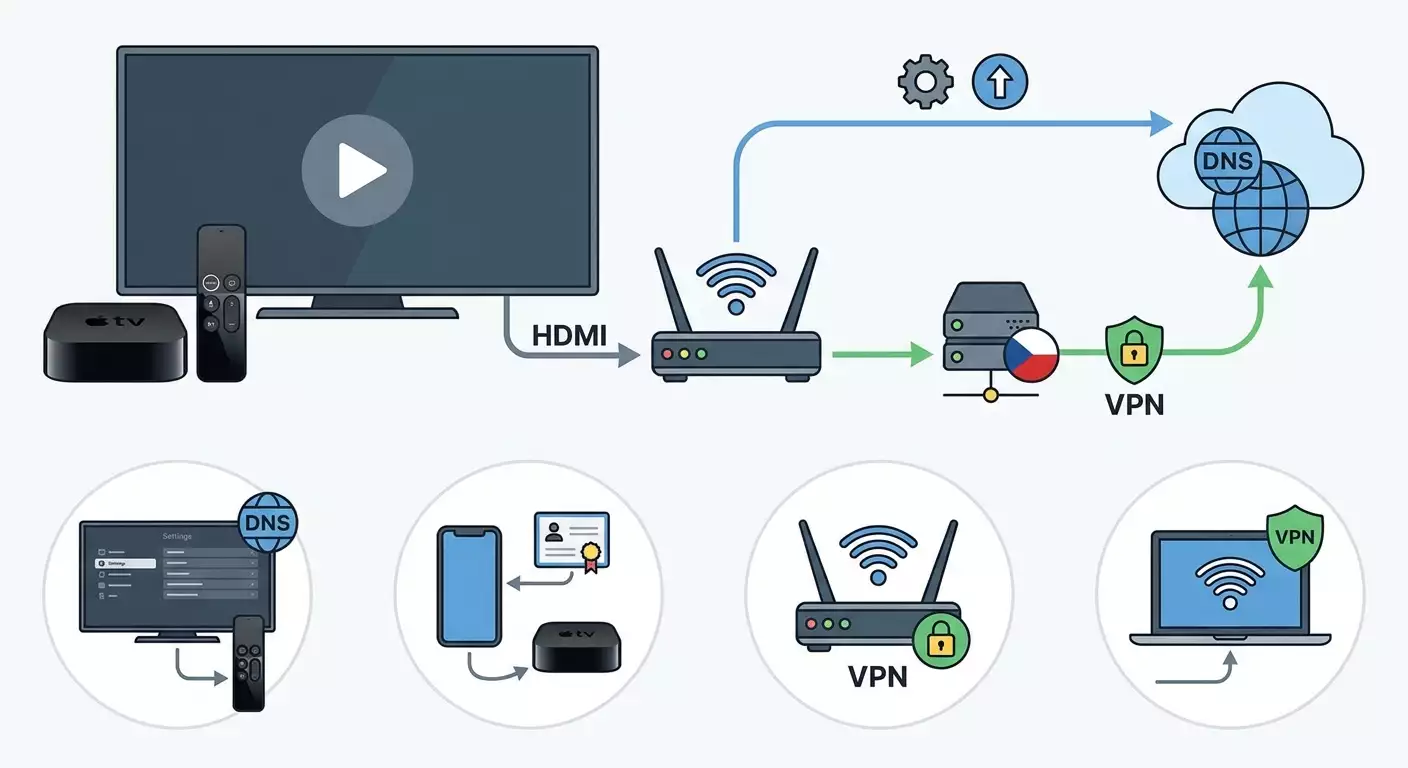
Step-by-step beginner's guide to setting up Apple TV 4K with Smart DNS or full VPN. We’ll cover the tvOS DNS profile, router VPN, sharing VPN from a PC, and verification steps. You’ll be bypassing restrictions and changing regions reliably within 60–120 minutes.
Content of the article
- Introduction
- Preparation
- Key concepts
- Step 1: choose the best approach — smart dns or full vpn
- Step 2: set up smart dns directly on apple tv (fastest method)
- Step 3: lock smart dns using tvos profile (auto-apply and reset protection)
- Step 4: enable full vpn via router (universal setup for apple tv and whole home)
- Step 5: full vpn via computer — create a hotspot with encrypted tunnel
- Step 6: optimization and control — routing policy, dns leak protection, region switching
- Result verification
- Common issues and fixes
- Additional features
- Faq
- Conclusion
Introduction
In this step-by-step guide, you'll set up your Apple TV 4K to reliably watch content without geo-restrictions or ISP blocks. We'll explore two effective methods: Smart DNS for quick region switching without encryption, and a full VPN (via router or computer), which encrypts all traffic and securely bypasses blocks. We’ll also show how to configure DNS through a tvOS profile so settings stay intact and apply automatically. By the end, you'll have a smooth setup: pick your desired region, start Apple TV 4K, and instantly access the libraries and services you want.
This guide is perfect for beginners, but also includes advanced sections covering: tvOS profiles, router routing policies, DNS leak protection, and device traffic segregation. We explain each step clearly and add checks along the way so you can trust the results.
Before you start, it’s useful to know Apple TV 4K doesn’t officially support client VPN apps for home users. Since tvOS 17, Apple added VPN support for corporate environments via MDM, but for home use, Smart DNS and network-level VPN (router or PC hotspot) are more practical and reliable. This isn’t a downside—it’s just a different approach: set up your network once, and all your streaming apps on Apple TV work as expected.
How long does it take? Basic Smart DNS setup right on Apple TV’s menu takes 10–15 minutes. Setting DNS through a tvOS profile the first time takes 20–40 minutes. Full VPN via router ranges from 30 to 90 minutes depending on the model. Sharing VPN from a computer requires about 20–40 minutes. Budget 60–120 minutes to take your time and avoid rushing.
Preparation
Make sure you have everything you need before getting started.
Required Tools and Access
- Apple TV 4K connected to your TV and network (Wi-Fi or Ethernet) with the latest tvOS version.
- Access to your Wi-Fi router settings (administrator login/password).
- Active Smart DNS subscription or access to a VPN server (with ready WireGuard/OpenVPN/IKEv2 configs, etc.).
- iPhone or Mac/Windows computer for alternative scenarios: installing the tvOS profile and/or sharing VPN.
System Requirements
- tvOS 16 or newer on Apple TV 4K for optimal menu and profile compatibility.
- Router supporting VPN client if you choose router VPN. Popular models include AsusWRT/AsusWRT-Merlin, Keenetic, MikroTik, OpenWrt, some TP-Link/GL.iNet.
- Computer with Wi-Fi adapter (for hotspot) and admin rights if planning to share VPN from PC or Mac.
Downloads and Prep
- If creating a tvOS DNS profile: Apple Configurator app for iPhone (from App Store) or Apple Configurator 2 on Mac. We'll demonstrate using iPhone, which is easier.
- VPN configuration files from your provider (WireGuard .conf, OpenVPN .ovpn, IKEv2 settings). Keep them locally and back them up.
- Smart DNS data: DNS server addresses and, if needed, account for binding your external IP.
Backups and Rollback
- Record your current Apple TV network settings: take screenshots of Wi-Fi/Ethernet parameters (especially DNS when set to Automatic).
- Save your router’s current config by exporting a backup via its web interface.
- Duplicate VPN config files into a secure cloud and on a flash drive.
✅ Check: You have your Smart DNS addresses or VPN configs ready, can access your router’s admin panel, and Apple TV is connected to the internet showing the tvOS home screen error-free.
Key Concepts
To move forward confidently, let's break down terms simply.
- Smart DNS – replaces DNS resolution only for certain services. You get access to needed content catalogs, but traffic isn’t encrypted. It’s fast, with minimal overhead—often the best choice for streaming video.
- Full VPN – all your traffic tunnels encrypted to a server in the chosen country. You get a new external IP, unblock restrictions, and privacy. On Apple TV, this is set up network-wide via a router or computer hotspot.
- tvOS Profile – a configuration file with settings (like DNS or HTTP proxy) for Apple TV. Profiles lock in settings so reconnects don’t reset them.
- Routing Policy – decide which devices or addresses use VPN, and which connect directly. Saves VPN bandwidth and improves latency for local services.
- DNS Leak – when your DNS requests go to a different server than configured. This breaks regional setups and reduces privacy.
⚠️ Note: Many Apple TV apps cache region and IP. After changing region via Smart DNS or VPN, you might need to reinstall apps, log out and back in, or fully restart Apple TV.
Step 1: Choose the Best Approach — Smart DNS or Full VPN
Goal
Pick the right option for your needs so you don’t waste time on unnecessary steps.
Detailed Instructions
- Ask yourself: do you only need access to regional streaming catalogs, or do you require full encryption and ISP block bypassing? If the former, go with Smart DNS. If the latter, choose full VPN.
- Check your router. If it easily supports OpenVPN/WireGuard and you have a stable connection, setting VPN on the router makes sense—it’s convenient for all home devices.
- If your router doesn’t support VPN or you’re in a hotel/rental, pick Smart DNS or VPN sharing from your laptop/PC.
- Consider multi-region use. If you switch countries often, Smart DNS offers flexibility: just swap the DNS/profile or profile template. Full encryption isn’t always needed.
- Check your speed. For 4K streaming, budget 25 Mbps or more. WireGuard is usually faster than OpenVPN, especially on weaker routers.
Tip: When in doubt, start with Smart DNS. It’s the fastest way to begin. Later, you can add router VPN and routing policy just for Apple TV.
✅ Check: Decide: 1) start with Smart DNS (quick), 2) set up full VPN immediately (security and versatility), or 3) prepare both and switch as needed.
Common Problems and Fixes
- Unsure if Smart DNS covers the service you want? Check with your provider for supported platforms and regions. Start with their trial if needed.
- Worried about slow VPN speed? Use WireGuard and a router with hardware encryption acceleration. Or do selective routing—only Apple TV through VPN, others direct.
Step 2: Set Up Smart DNS Directly on Apple TV (Fastest Method)
Goal
Enter Smart DNS server addresses in Apple TV network settings to immediately unlock regional libraries.
Step-by-Step Instructions
- On Apple TV, open Settings.
- Go to Network. If on Wi-Fi, select your Wi-Fi network; if wired, select Ethernet.
- Open Configure DNS. By default, it’s Automatic. Choose Manual.
- Enter the primary Smart DNS server address, e.g., 123.45.67.89. Confirm.
- If your provider gave two addresses, find Add Server or enter the second DNS after saving the first (varies by tvOS). Enter the secondary, e.g., 98.76.54.32. Confirm.
- Return to the Network screen and scroll down. Select Renew Lease or disconnect and reconnect your network so Apple TV uses the new DNS.
- Fully restart Apple TV: Settings → System → Restart. This clears regional and DNS caches in some apps.
- If your Smart DNS provider requires binding your external IP, open their app or site on your phone/PC connected to the same network and confirm binding. When your ISP changes your IP, you may need to update this.
⚠️ Note: If you set Smart DNS on Apple TV but your Wi-Fi router forcibly intercepts DNS requests (redirects UDP 53 to its own servers), it won’t work. Check router settings for DNS redirection and disable it for your Apple TV IP.
Tip: Give your Apple TV a unique name in Settings → AirPlay and HomeKit → Device Name to find it easily in router client lists and diagnostics.
✅ Check: Open your streaming app. If the library matches the chosen region, it works. For extra verification, install Speedtest from the App Store on Apple TV: check server and location to confirm DNS routing is applied even if IP stays local—which is normal for Smart DNS.
Common Problems and Fixes
- App still shows local library. Cause: region cache. Fix: log out of the app, delete it, restart Apple TV, and reinstall.
- Smart DNS doesn’t work for some services. Cause: provider missed new domains. Fix: update config from Smart DNS provider or switch to full VPN for those apps.
- No internet after entering DNS. Cause: typo in DNS address. Fix: switch back to Configure DNS → Automatic, verify connection, then carefully re-enter DNS addresses.
Step 3: Lock Smart DNS Using tvOS Profile (Auto-apply and Reset Protection)
Goal
Create and install a configuration profile on Apple TV that fixes your DNS and optionally proxy settings. This helps with frequent network reconnects and prevents unwanted DNS overrides.
What You’ll Need
- iPhone with Apple Configurator installed (from App Store).
- Two Smart DNS addresses and optional HTTP proxy parameters (host and port) for advanced routing.
Step-by-Step Instructions
- Connect Apple TV and iPhone to the same Wi-Fi network. Make sure Bluetooth is enabled on iPhone.
- Open Apple Configurator on iPhone. Tap the plus icon and choose Add Devices or Prepare Nearby Device.
- On Apple TV, go to Settings → Remotes and Devices → Remote and Device Apps. Wait for pairing prompt.
- On iPhone, select your Apple TV from the nearby devices list. Confirm the pairing code shown on your TV.
- When Apple TV appears as a card in Apple Configurator, tap Configure, then Add Configuration Profile.
- Create the profile: give it a name like tvOS-SmartDNS-Home. Add a Wi-Fi payload, select your SSID, then Configure DNS → Manual, entering your primary and secondary Smart DNS addresses. Even if your network is already saved on Apple TV, adding Wi-Fi payload with DNS ensures the profile overrides settings.
- Optionally, add a Global HTTP Proxy payload. Set it to Manual, input proxy server (like proxy.example), port (e.g., 3128). Enable Authentication if needed. Note: a global HTTP proxy affects HTTP/HTTPS, but not other protocols; for streaming video, DNS alone is usually enough.
- Save the profile on your iPhone. Tap Install Profile on device. Confirm installation on Apple TV if prompted.
- After installation, restart Apple TV: Settings → System → Restart.
Tip: Keep the profile template on your iPhone: to switch regions, duplicate the profile and replace Smart DNS addresses. Delete old profiles from Settings → General → Profiles, then install the new one via Apple Configurator.
Tip: If you frequently move between networks, add multiple Wi-Fi payloads in one profile for different SSIDs, each with its own DNS. tvOS will apply the matching block depending on the connected network.
✅ Check: Open Settings → General → Profiles and confirm the profile is installed and active. In Network → [your network] → Configure DNS you should see Manual mode with your DNS addresses. Streaming apps should show content from the chosen Smart DNS region.
Common Problems and Fixes
- Profile won’t install. Cause: no connection between iPhone and Apple TV. Fix: ensure both are on the same network, Bluetooth is on, restart both devices and try pairing again.
- Global proxy blocks access. Cause: wrong host/port or proxy rejecting traffic. Fix: remove or disable proxy in profile and reinstall with DNS only.
- Profile applies but DNS doesn’t change. Cause: conflict with old network settings. Fix: on Apple TV, forget your Wi-Fi network and reconnect, then reinstall the profile.
Step 4: Enable Full VPN via Router (Universal Setup for Apple TV and Whole Home)
Goal
Run a VPN client on your router, route only Apple TV or the entire network through it, protect against DNS leaks, and ensure smooth 4K playback.
What You’ll Need
- Router with VPN client support (WireGuard/OpenVPN/IKEv2/L2TP, etc.).
- VPN configuration files and settings from your provider.
- Apple TV MAC address for convenient rule binding (Settings → Network → [your network] → Wi-Fi/Ethernet address).
General Setup Instructions (for popular firmware)
- Open your router’s web interface. Log in as administrator.
- Find VPN or Internet → VPN Client section. Choose a protocol. WireGuard is generally fastest and easiest.
- Import config: WireGuard uploads .conf, OpenVPN .ovpn, IKEv2 requires server, IDs, authentication, and certificates.
- Save profile and enable VPN client. Wait until status shows Connected. Check logs—it should display remote server IP and routing info.
- Set routing policy: create a rule sending your Apple TV device (by MAC or static IP) through the VPN interface. Other devices stay on default direct connection to save bandwidth.
- Secure DNS: enable DNS redirection for Apple TV’s traffic to VPN’s DNS or a reliable public DNS that works through the tunnel. On some firmware, this requires firewall rules redirecting UDP/TCP port 53 for Apple TV’s IP into the tunnel.
- If you used a tvOS profile with custom DNS before, ensure it matches your VPN setup. Usually, with full VPN it’s best to use your VPN provider’s DNS or built-in resolvers.
- Save router configuration. Restart VPN service and reboot router if needed.
- Reconnect Apple TV to the network (disable/enable Wi-Fi or reboot the device).
Tip: Assign a static DHCP lease for your Apple TV on the router to keep routing and DNS rules consistent for the same IP.
Tip: If your router is weak, pick a nearby VPN server location and WireGuard protocol to minimize latency and CPU load compared to OpenVPN.
⚠️ Note: Some ISPs block VPN protocols. If WireGuard or OpenVPN fails to connect, try TCP mode, change ports, or use alternatives like IKEv2 or SSTP if your router and server support them.
Expert Tip: For stable Apple TV performance and flexible routing, a personal VPN server with a dedicated IP is ideal. One notable service is vpn.how: every client gets a unique IP, supports WireGuard, OpenVPN, IKEv2, L2TP, SSTP—you can pick what fits your router and scenario. Server locations cover popular regions including Moscow, St. Petersburg, Amsterdam, Frankfurt, London, New York, San Jose, Chicago, Singapore, Sydney, Madrid, Helsinki, Stockholm, Warsaw, Copenhagen, Stavanger. Payment options: Russian cards (including Tinkoff, Ozon), SBP, USDT/BTC. Pricing starts at 490 RUB/day or 2490 RUB/month, with discounts for longer terms. Server spins up within 5 minutes post-payment, no logs kept. The dashboard offers ready configs for WireGuard/OpenVPN/IKEv2—download and import directly to your router or device client. This drastically reduces setup time and errors.
✅ Check: On your router, VPN status reads Connected. Apple TV gets a static IP in client list. The routing rule sends its traffic through VPN. On Apple TV, apps open error-free and Speedtest confirms routing via the chosen region. Streaming apps show the country’s library.
Common Problems and Fixes
- VPN connection keeps dropping. Cause: unstable line or incorrect keys. Fix: double-check configs, lower MTU (e.g., 1280 for WireGuard), change server/port.
- Some apps won’t load on Apple TV. Cause: DNS is blocked or split tunneling is misconfigured. Fix: allow direct access to local resources and force DNS redirection through the tunnel only, not direct internet.
- Increased latency and lowered speeds. Cause: distant server or overloaded node. Fix: pick closer server, switch to WireGuard, ensure router isn't overloaded (check CPU load).
Step 5: Full VPN via Computer — Create a Hotspot with Encrypted Tunnel
Goal
Share internet from a VPN-connected computer to Apple TV. This option suits routers without VPN support or when you can’t change router settings (e.g., rented housing).
Option A: macOS (Internet Sharing)
- Connect your Mac to the internet and launch your VPN client. Connect to the desired server. Verify internet browsing goes through VPN.
- Open System Settings → Sharing → Internet Sharing.
- Select your VPN interface as the source (for WireGuard, it might be utunX or wgX; for OpenVPN, tun/tap). Set target computers to Wi-Fi.
- Click Wi-Fi Options, set Network Name, Channel, and Password. Save.
- Enable Internet Sharing and confirm permissions.
- On Apple TV, connect to the new Wi-Fi network. Test app access.
Option B: Windows 11/10 (Mobile Hotspot + ICS)
- Connect your PC to VPN using WireGuard/OpenVPN or similar client. Check that internet routes through VPN.
- Open Settings → Network & Internet → Mobile Hotspot. Turn on sharing over Wi-Fi. Set hotspot name and password.
- Open Control Panel → Network and Sharing Center → Change adapter settings. Find your VPN adapter (WireGuard—WG, OpenVPN—TAP/TUN).
- Right-click VPN adapter → Properties → Sharing tab. Enable Allow other users to connect through this computer’s internet connection. Select the mobile hotspot adapter (usually Microsoft Wi-Fi Direct Virtual Adapter).
- Save settings. Toggle the mobile hotspot OFF and ON to apply.
- Connect Apple TV to the PC’s Wi-Fi hotspot. Open apps and check region.
Tip: If the Windows hotspot doesn’t appear on Apple TV’s network list, update your Wi-Fi driver and ensure it supports Hosted Network/SoftAP mode.
✅ Check: Apple TV has internet and streaming apps work. Speedtest on Apple TV shows traffic routing through VPN server. Temporarily disable VPN on your computer—you’ll lose internet or see IP/route change on Apple TV, confirming traffic flows through the PC.
Common Problems and Fixes
- Streaming apps freeze. Cause: weak Wi-Fi signal from PC/Mac. Fix: move Apple TV closer, use 5 GHz band, reduce interference, close unnecessary apps.
- Windows won’t share VPN adapter. Cause: security policy or third-party firewall. Fix: temporarily disable firewalls, mark adapter as trusted, reboot system.
- macOS doesn’t detect VPN interface for sharing. Cause: WireGuard/OpenVPN client created interface after sharing started. Fix: start VPN first, then open Internet Sharing and select interface again.
Step 6: Optimization and Control — Routing Policy, DNS Leak Protection, Region Switching
Goal
Fine-tune your setup for stability, prevent DNS leaks, switch regions smoothly, and minimize latency.
Detailed Instructions
- Routing policy: on the router, create rules routing only Apple TV through VPN to save speed for other devices. In OpenWrt use Policy Based Routing or mwan3; AsusWRT has VPN Director/Policy Rules; Keenetic uses Network Rules.
- DNS protection: forcibly redirect Apple TV’s DNS traffic into the tunnel. In firewall, add DNAT/REDIRECT rules for UDP/TCP port 53 sourced from Apple TV’s IP to VPN DNS server.
- Leak tests: temporarily set an invalid local DNS on Apple TV (e.g., 0.0.0.0) and verify router rules intercept and correct it so pages/apps still work. Then restore the correct DNS.
- Region switching: keep multiple tvOS profiles with different Smart DNS servers. For VPN, maintain several configs on router and activate the desired one, preserving routing rules.
- App cache: after changing regions, clear app cache by restarting Apple TV and reinstalling apps or re-logging in if needed.
- MTU/packet size: if streaming buffers on VPN, reduce tunnel interface MTU (1280 is a good start for WireGuard) and retest.
Tip: Name your router profiles with region tags like WG-US, WG-UK, OVPN-DE so you can quickly activate the right route and housemates don’t get confused.
Tip: Don’t forget local services like AirPlay and home control. If they slow down with VPN on for Apple TV, whitelist local addresses in routing policies.
✅ Check: Activating/deactivating profiles predictably changes content region. Apps don’t crash, no DNS leaks, low latency, 4K streams start fast without buffering.
Result Verification
Checklist: What Should Work
- Apple TV reliably connects to the network with continuous internet access.
- App library region matches your chosen setup (Smart DNS or VPN).
- Region switches reliably when changing profile or config.
- 4K/HDR streams start within 3–7 seconds, episode switches are instant.
- Other home devices don’t experience speed drops due to Apple TV (if selective routing is enabled).
How to Test
- Install Speedtest on Apple TV. Test before and after enabling VPN/Smart DNS. Note the server region and ping.
- Launch one app per service you configured to verify access to exclusive regional titles.
- Switch region: swap DNS profile or VPN config. Repeat tests.
Success Indicators
- Stable speed above 25 Mbps suitable for 4K streaming.
- Reasonable ping to regional server (up to 80–120 ms for intercontinental, lower is better).
- No region error messages in apps.
- No DNS leaks as seen in router logs or built-in tools.
Common Issues and Fixes
- Problem: App doesn’t update region. Cause: cached geolocation. Fix: log out of app, uninstall, restart Apple TV, reinstall and log back in.
- Problem: No internet after changing DNS. Cause: typo. Fix: temporarily return to Configure DNS → Automatic, verify connection, then carefully reenter DNS.
- Problem: VPN connected on router but Apple TV goes direct. Cause: missing routing rule. Fix: add MAC/IP-based rule routing Apple TV through VPN, save and restart VPN.
- Problem: Slow VPN speeds. Cause: overloaded server or OpenVPN on low-power CPU. Fix: switch to WireGuard, select closer server, lower encryption, check MTU.
- Problem: DNS leaks break region setup. Cause: router doesn’t redirect DNS through tunnel. Fix: configure NAT/REDIRECT for UDP/TCP 53 from Apple TV IP to VPN DNS server.
- Problem: tvOS profile doesn’t apply. Cause: incomplete pairing in Apple Configurator. Fix: reconnect devices, remove profile, reinstall using Add Configuration Profile.
- Problem: Global proxy interferes with streaming. Cause: proxy blocks non-standard requests. Fix: remove proxy from profile, use only DNS or full VPN.
Additional Features
Advanced Settings
- Traffic segregation by domains: on OpenWrt, use ipsets and dnsmasq to route only media service traffic through VPN to reduce load.
- Auto-switching on availability: if VPN server is down, routing temporarily defaults to direct to avoid downtime.
- QoS/Prioritization: prioritize Apple TV traffic to prevent downloads from affecting playback.
Optimization
- DNS cache on router: reduce name lookup delays when switching apps frequently.
- Logs and monitoring: weekly review VPN logs and bandwidth charts to catch degradation early.
Other Possibilities
- Deploy your own DNS resolver inside VPN for full domain resolution control.
- Script region switching with router profiles and quick smartphone shortcuts.
FAQ
Question: Can I install a VPN app directly on Apple TV?
Answer: There are no standard VPN clients for tvOS in the App Store for home use. Since tvOS 17, Apple supports VPN in MDM scenarios, but Smart DNS or VPN via router/PC is more practical for home.
Question: Which is better for 4K — Smart DNS or VPN?
Answer: For regional libraries and speed, Smart DNS is best. For ISP blocks or privacy, use VPN (WireGuard on router preferred).
Question: Can I switch countries quickly?
Answer: Absolutely. Use several tvOS profiles with different Smart DNS for multiple regions. For VPN, keep several configs on the router and switch active one.
Question: Do I have to change my Apple ID region?
Answer: For some apps, yes—you need an account for that store’s region. For already installed apps, Smart DNS or VPN often suffice without changing Apple ID.
Question: Why doesn’t Smart DNS encrypt traffic – is it safe?
Answer: For video streaming, it’s usually adequate. For privacy and ISP protection, use full VPN.
Question: How do I know there are no DNS leaks?
Answer: Route Apple TV DNS through router VPN DNS and check logs/statistics that requests go through the tunnel. Apps showing correct region without fallback is a good sign.
Question: Can I combine Smart DNS and VPN?
Answer: Yes, but carefully. Usually with full VPN, use VPN provider DNS. Smart DNS works best without VPN; with VPN on, it may not be needed and can conflict.
Question: What if my router can’t handle OpenVPN?
Answer: Switch to WireGuard or share VPN from a computer. Alternatively, upgrade to a router with hardware encryption acceleration.
Question: How do I quickly revert changes?
Answer: On Apple TV, set Configure DNS → Automatic and remove profiles. On router, disable VPN client and delete routing rules. Restart devices.
Conclusion
You’ve completed the full cycle: chosen between Smart DNS and full VPN, quickly set DNS in Apple TV menus, then locked it via tvOS profile. Next, you mastered router VPN with routing policies and DNS leak protection, plus an alternative – sharing VPN from a computer. Now your Apple TV 4K reliably displays the right regional libraries and smoothly plays 4K/HDR content. You know how to switch regions, verify results, and troubleshoot common issues.
What’s next: save your working profiles and configs, set up router monitoring, and regularly check speeds and node availability. If your needs change, adding new regions and optimizing routing is easy. For maximum stability and IP control, use a personal VPN server with ready configs for your router—this cuts setup time and reduces errors.
Well done! You now confidently manage your Apple TV 4K network environment and consistently achieve the results you want.